OCH Admin > Managing Trainings Guide
Managing Trainings
< Back to Manage Trainings and Data Help Page
Managing Trainings & Enrollment
OneCity Health Administrators (OCH Admins) will use the Manage Trainings page to easily track enrollment and participation in online and in-person trainings. OCH admins will have access to a registration table (roster) for each training that will list the employees that have either self-registered for or been bulk-registered including their employee and person information. The Manage Trainings page is your hub for tracking and managing training sessions, registrations, and other information.
Attendance Verification
For in-person training events, there is a very important step required for OCH Admins and Training Coordinators: in order for attendees to receive credit for their participation, it is necessary to Verify Attendance after the training has occurred. Only once an attendance list has been verified but an administrator will the participants receive credit.
Disclaimer: HWapps is in the process of integrating the back-end Course Participants Database (CPD) and Master Training Database (MTD) with the front-end Rosters (discussed in this guide). Before these systems can fully “talk” to eachother, if you make any changes – changes to employee information or deletion of registrations – be sure you reflect the changes in the other databases. For example: If I want to unenroll Jane Doe for Training A on the front-end Rosters, I can delete her entry on the Registration table. I would then want to search for her in the CPD and remove her entry there as well. Once the integration has occurred, this will no longer be necessary and making a change in one place will make the change everywhere. If you have any questions, please contact HWapps Support at support@hwapps.org.
Key Terms
Manage Trainings page: the master-list of all OCH LMS trainings with key enrollment information outlined and previewed; this is the master list through which the administrator locates and selects a training to examine.
The master list of registration tables can be accessed on the Manage Trainings page: http://statenislandpps.org/ltd-training-listing/
Registration table: a table that lists the employees who have either self-registered or been bulk-registered for an In-Person training in the OCH LMS; this table reflects the expected attendees for an In-Person training. OCH Admins have the ability to edit the details for registered participants in the table.
Table of Contents
I. Manage Trainings
1. Accessing Manage Trainings page
2.Navigating the Manage Trainings table
3. Accessing the Registration tables (rosters)
4. Navigating the Registration table (roster)
II. Attendance Verification
1. Verifying Attendance process
I. Manage Trainings
1. Accessing Manage Trainings page
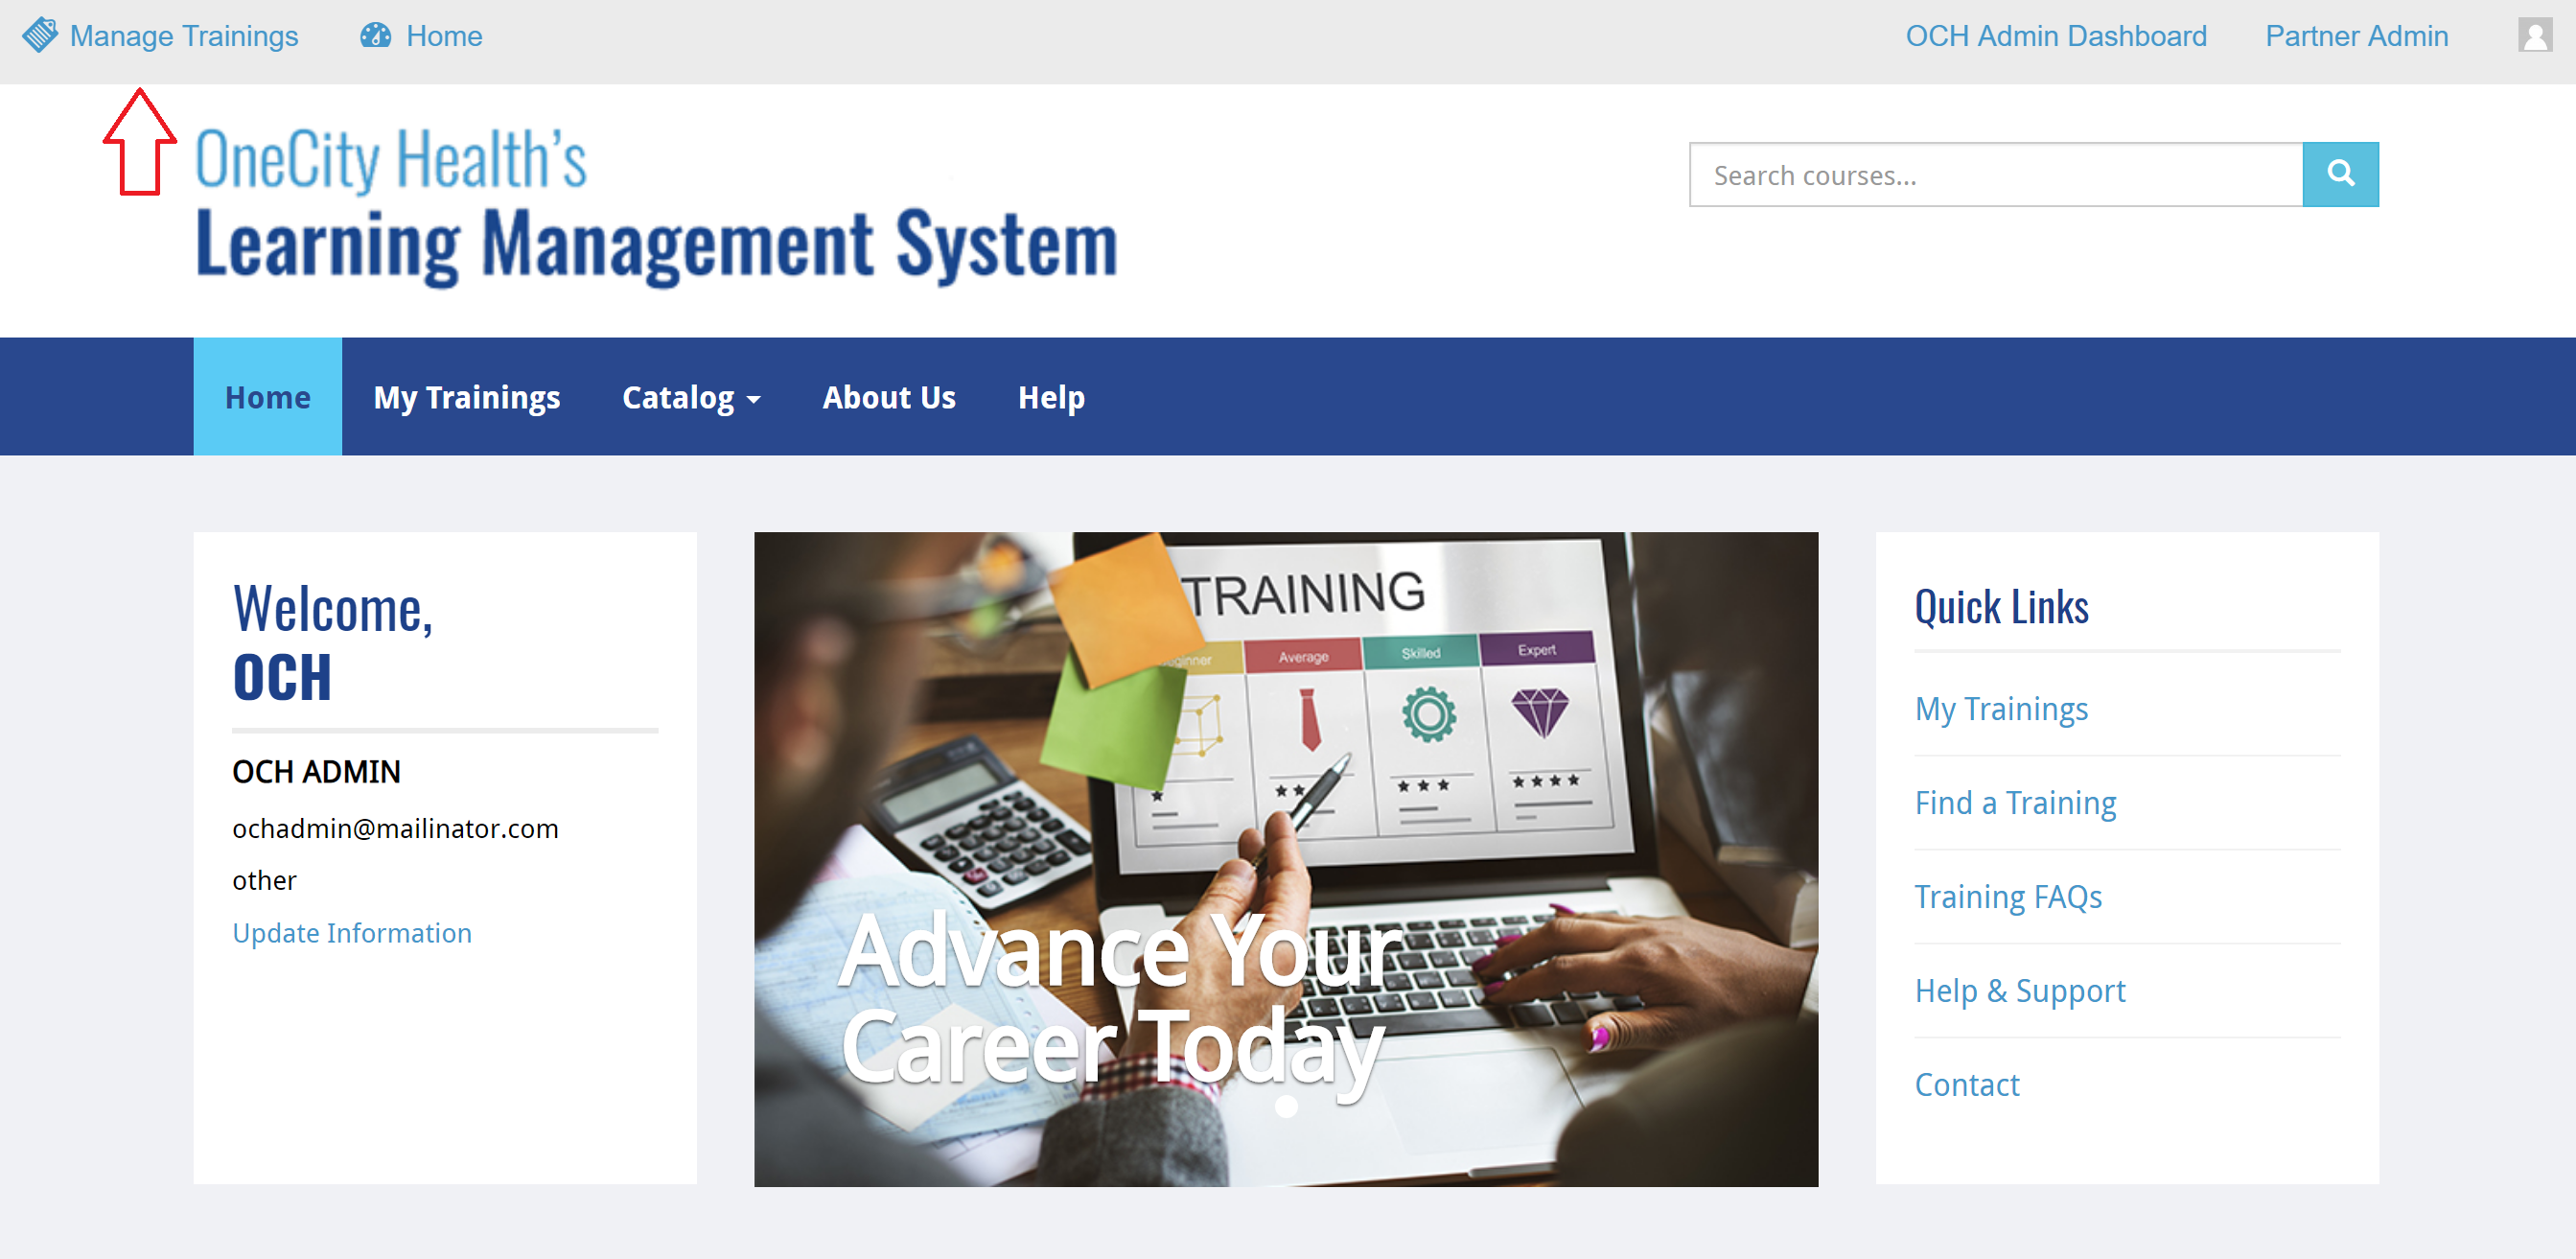
Step 1: Ensure you are logged into your OCH Admin account and click Manage Trainings in the top left of the screen.
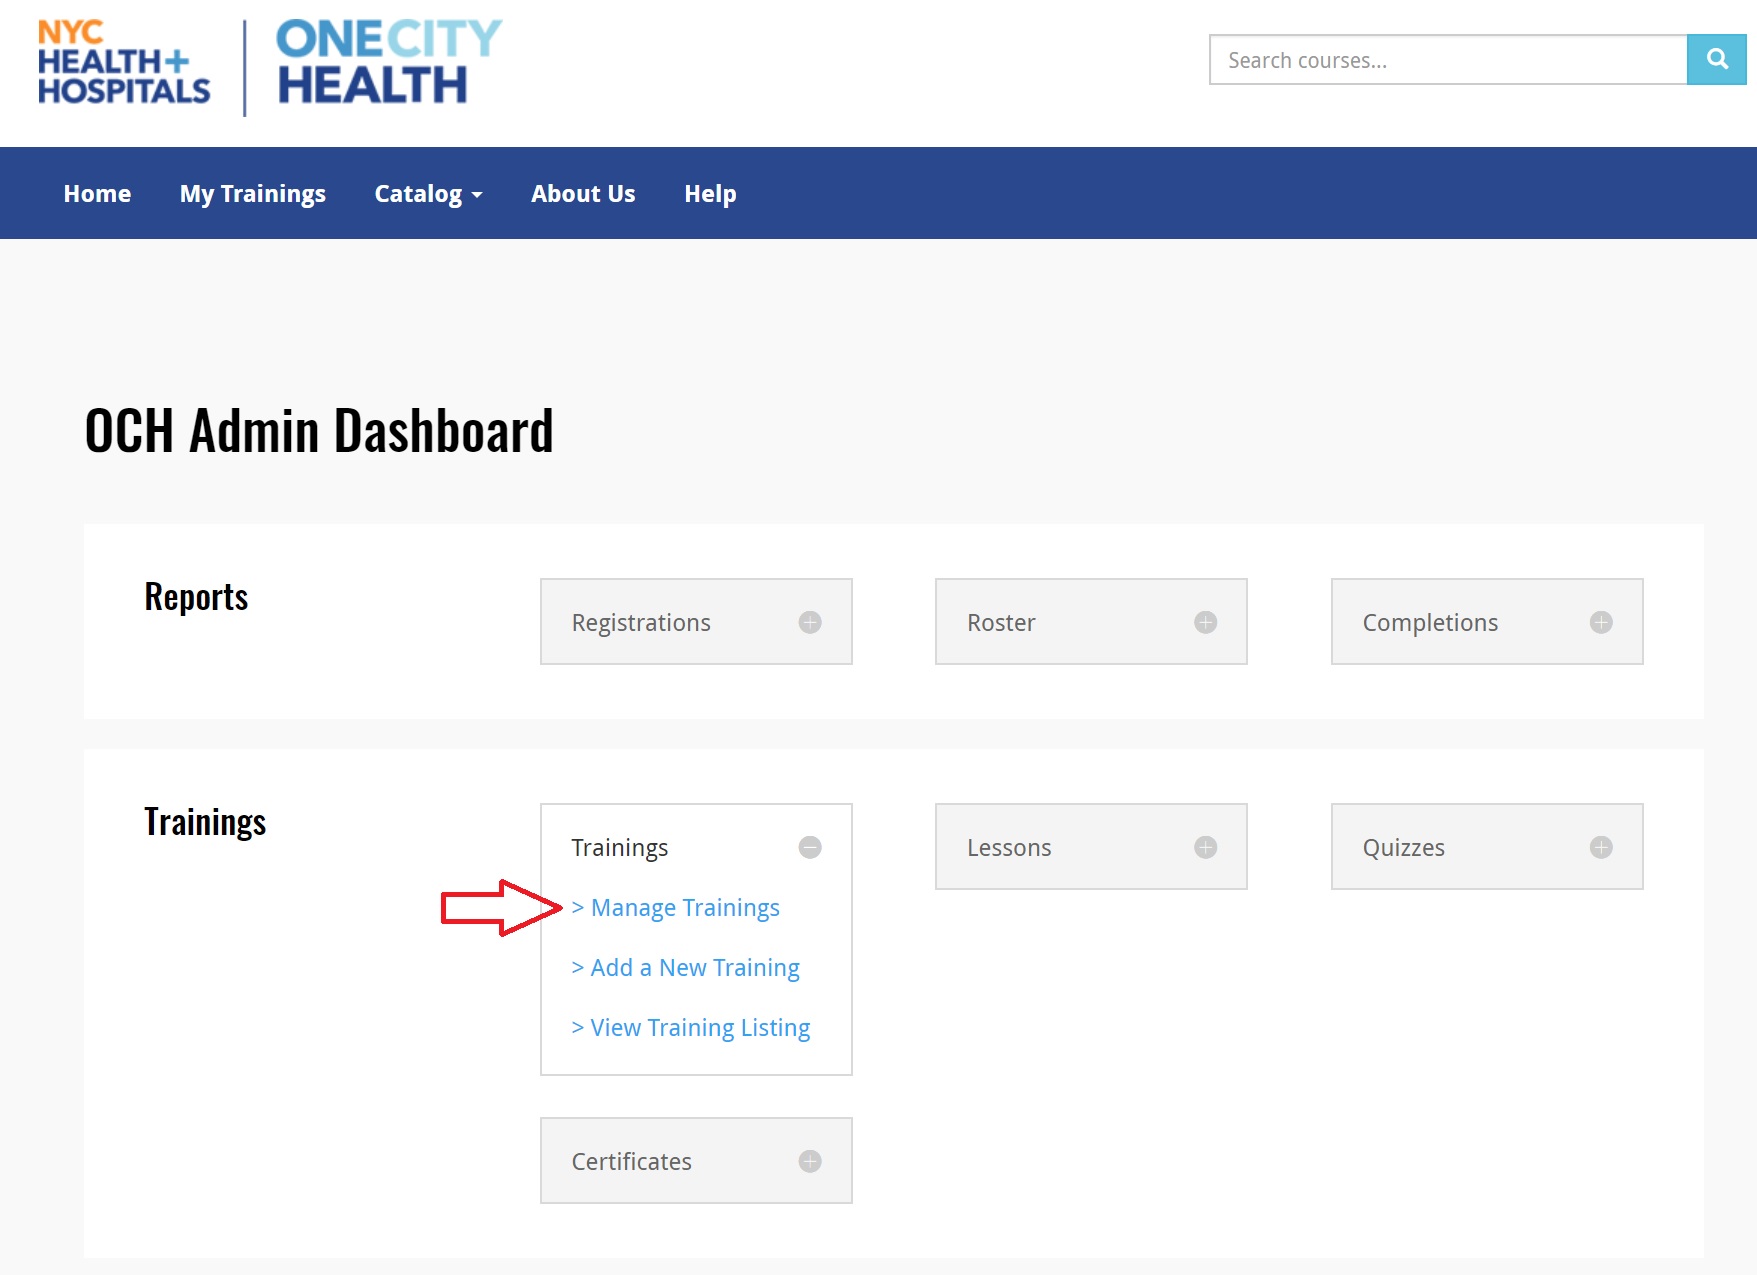
You can also access this from the OCH Admin Dashboard by clicking Manage Trainings within the Trainings row.
2. Navigating the Manage Trainings table
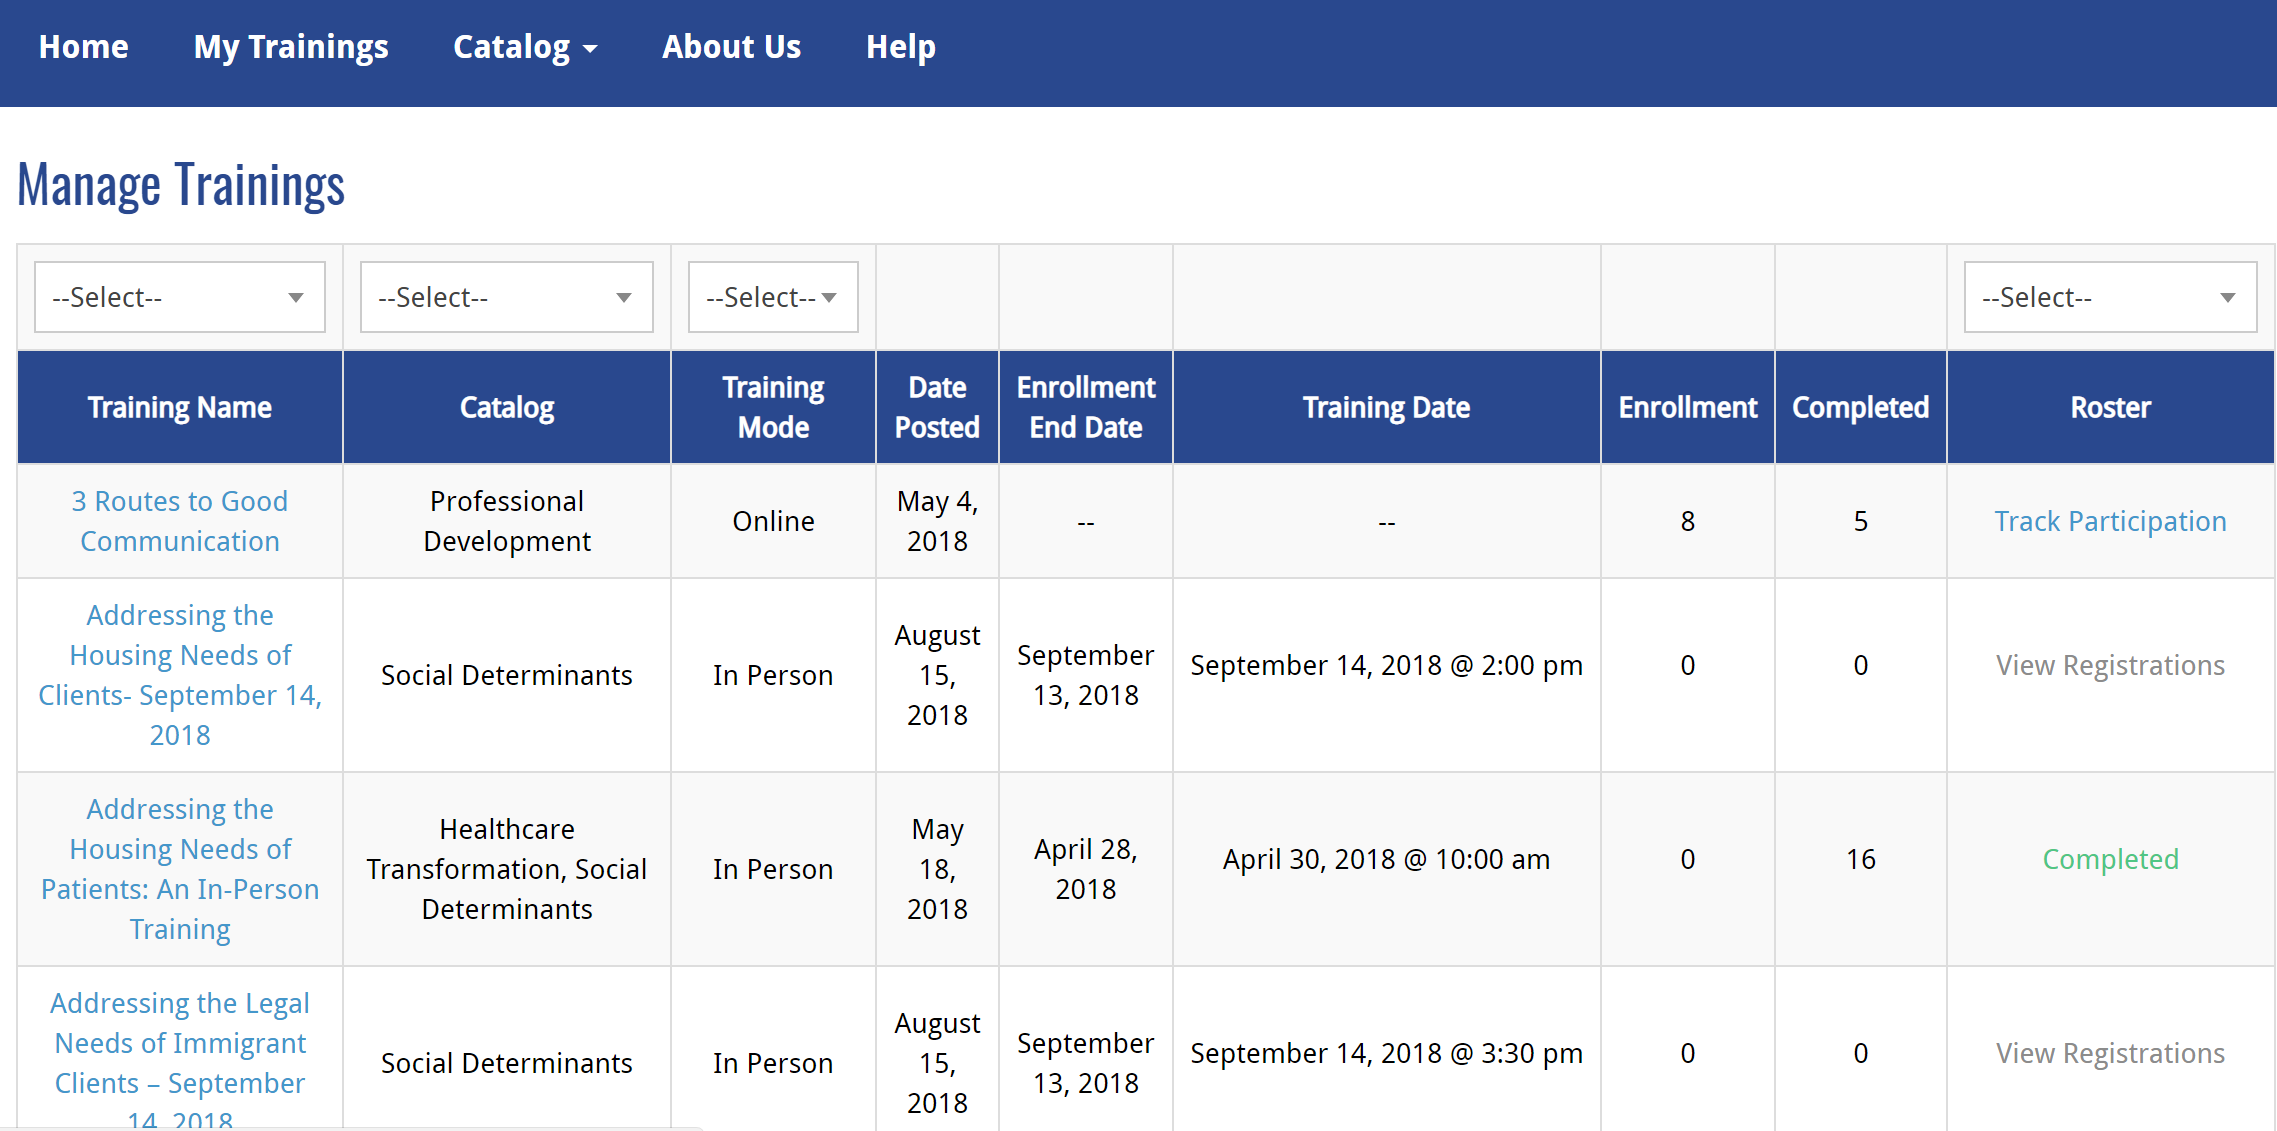
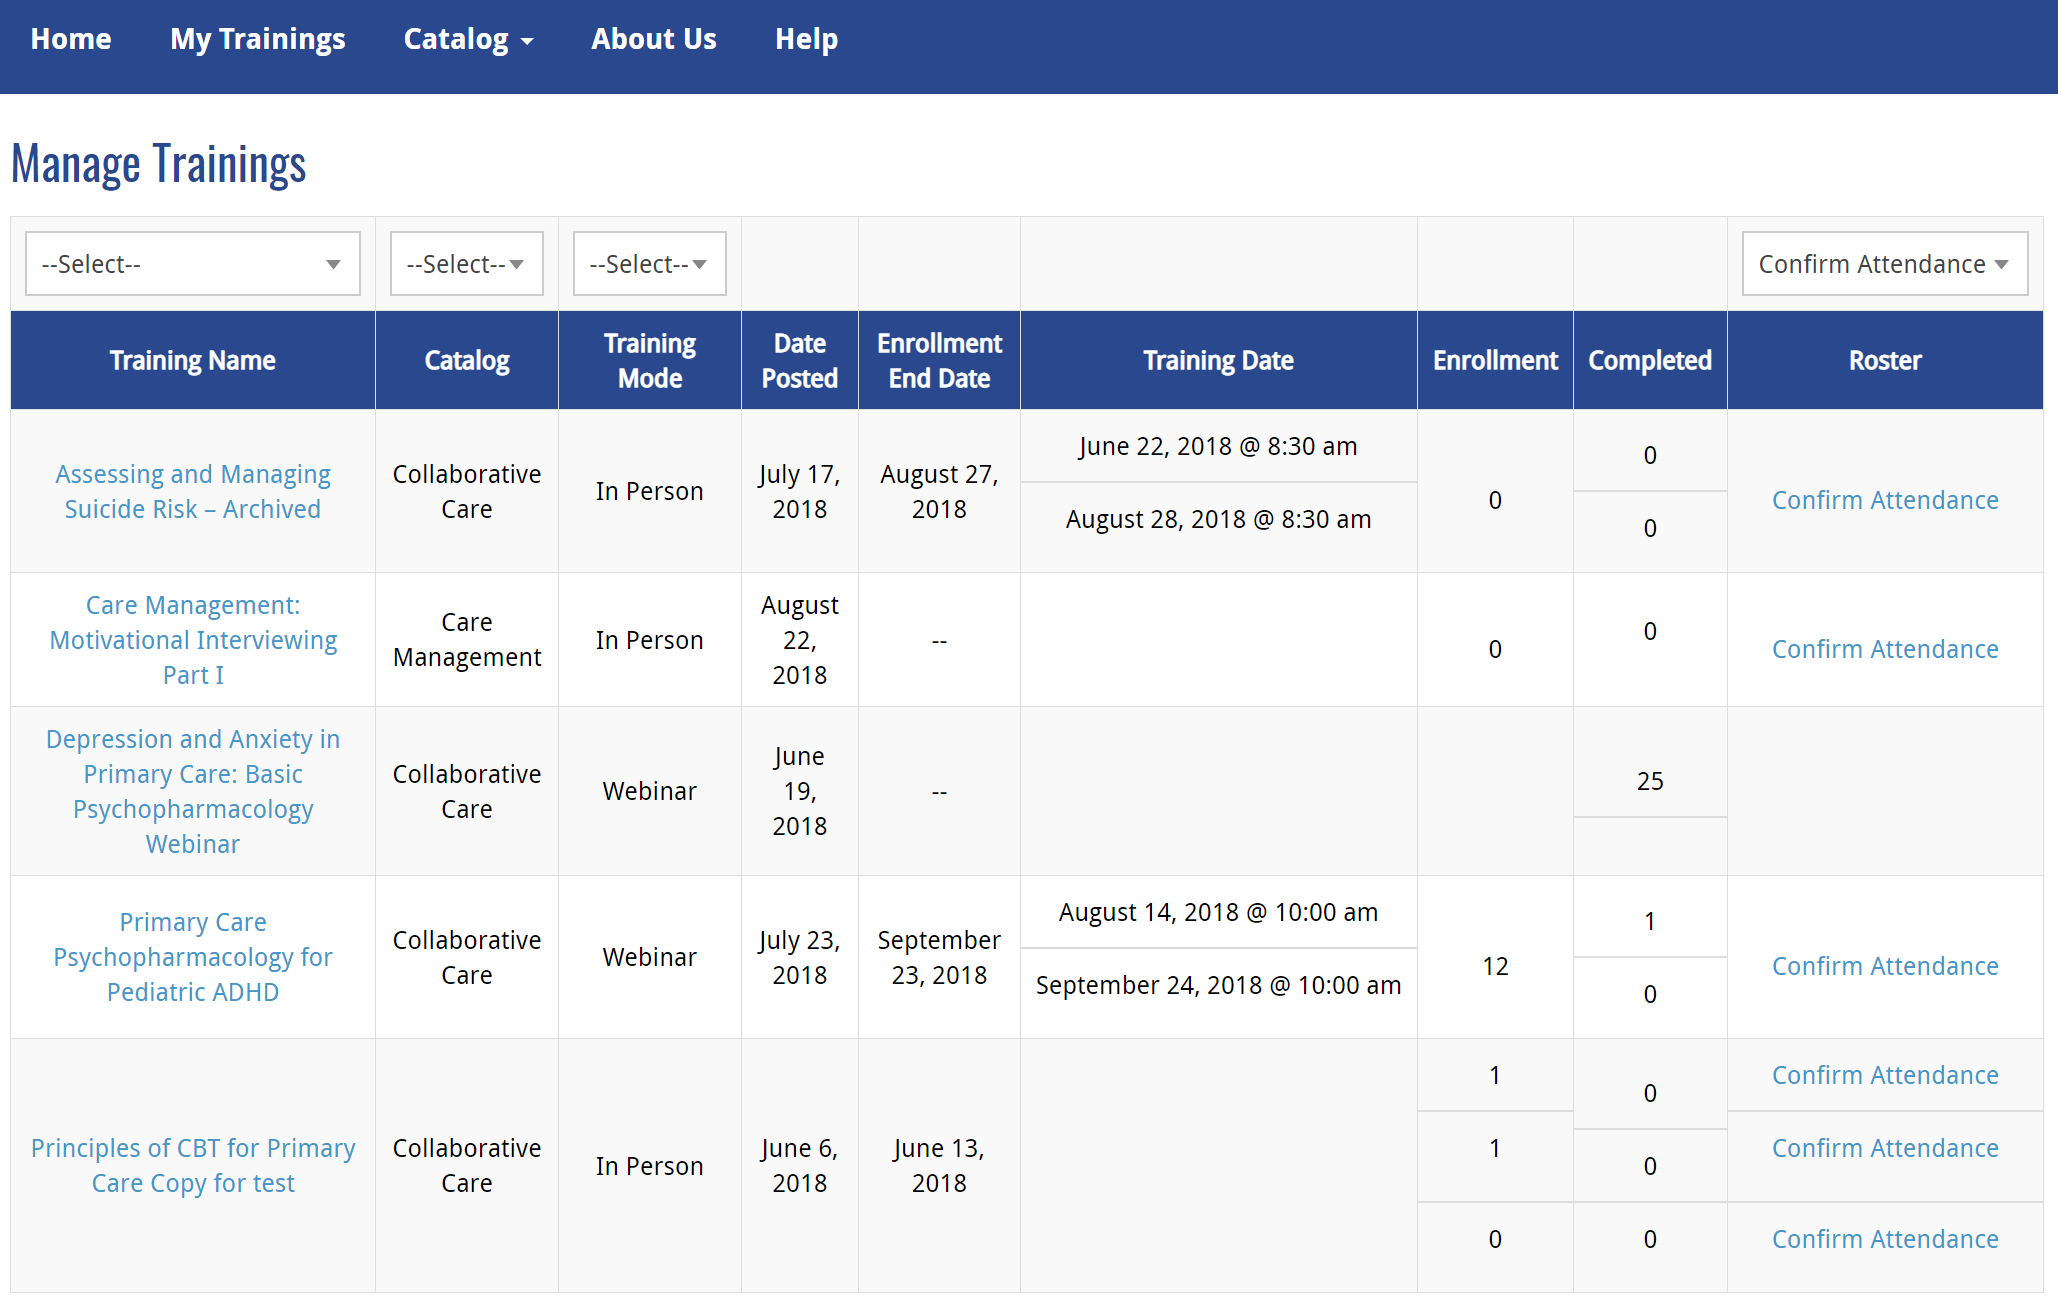
You will be presented with a table of all trainings posted on the OCH LMS, as well as each individual session for in-person trainings that have different dates. From here, you will be able to easily reference the following information about each training:
- Name of training
- Catalog – the initiative the trainings falls under
- Training mode – whether the training is online, in-person, or webinar
- Date posted – when the training was listed on the OCH LMS
- Enrollment end date – if the training’s registration closes on a certain future date
- Training Date – the date the training is being held
- Enrollment – # of people enrolled; if online, this is the number of people enrolled but not complete in the training; if in-person, this indicates the number of people enrolled for the future event
- Completed – # of people completed; if online, these employees have finished the training on the LMS; if in-person, these employees’ attendance in the training has been confirmed by an administrator
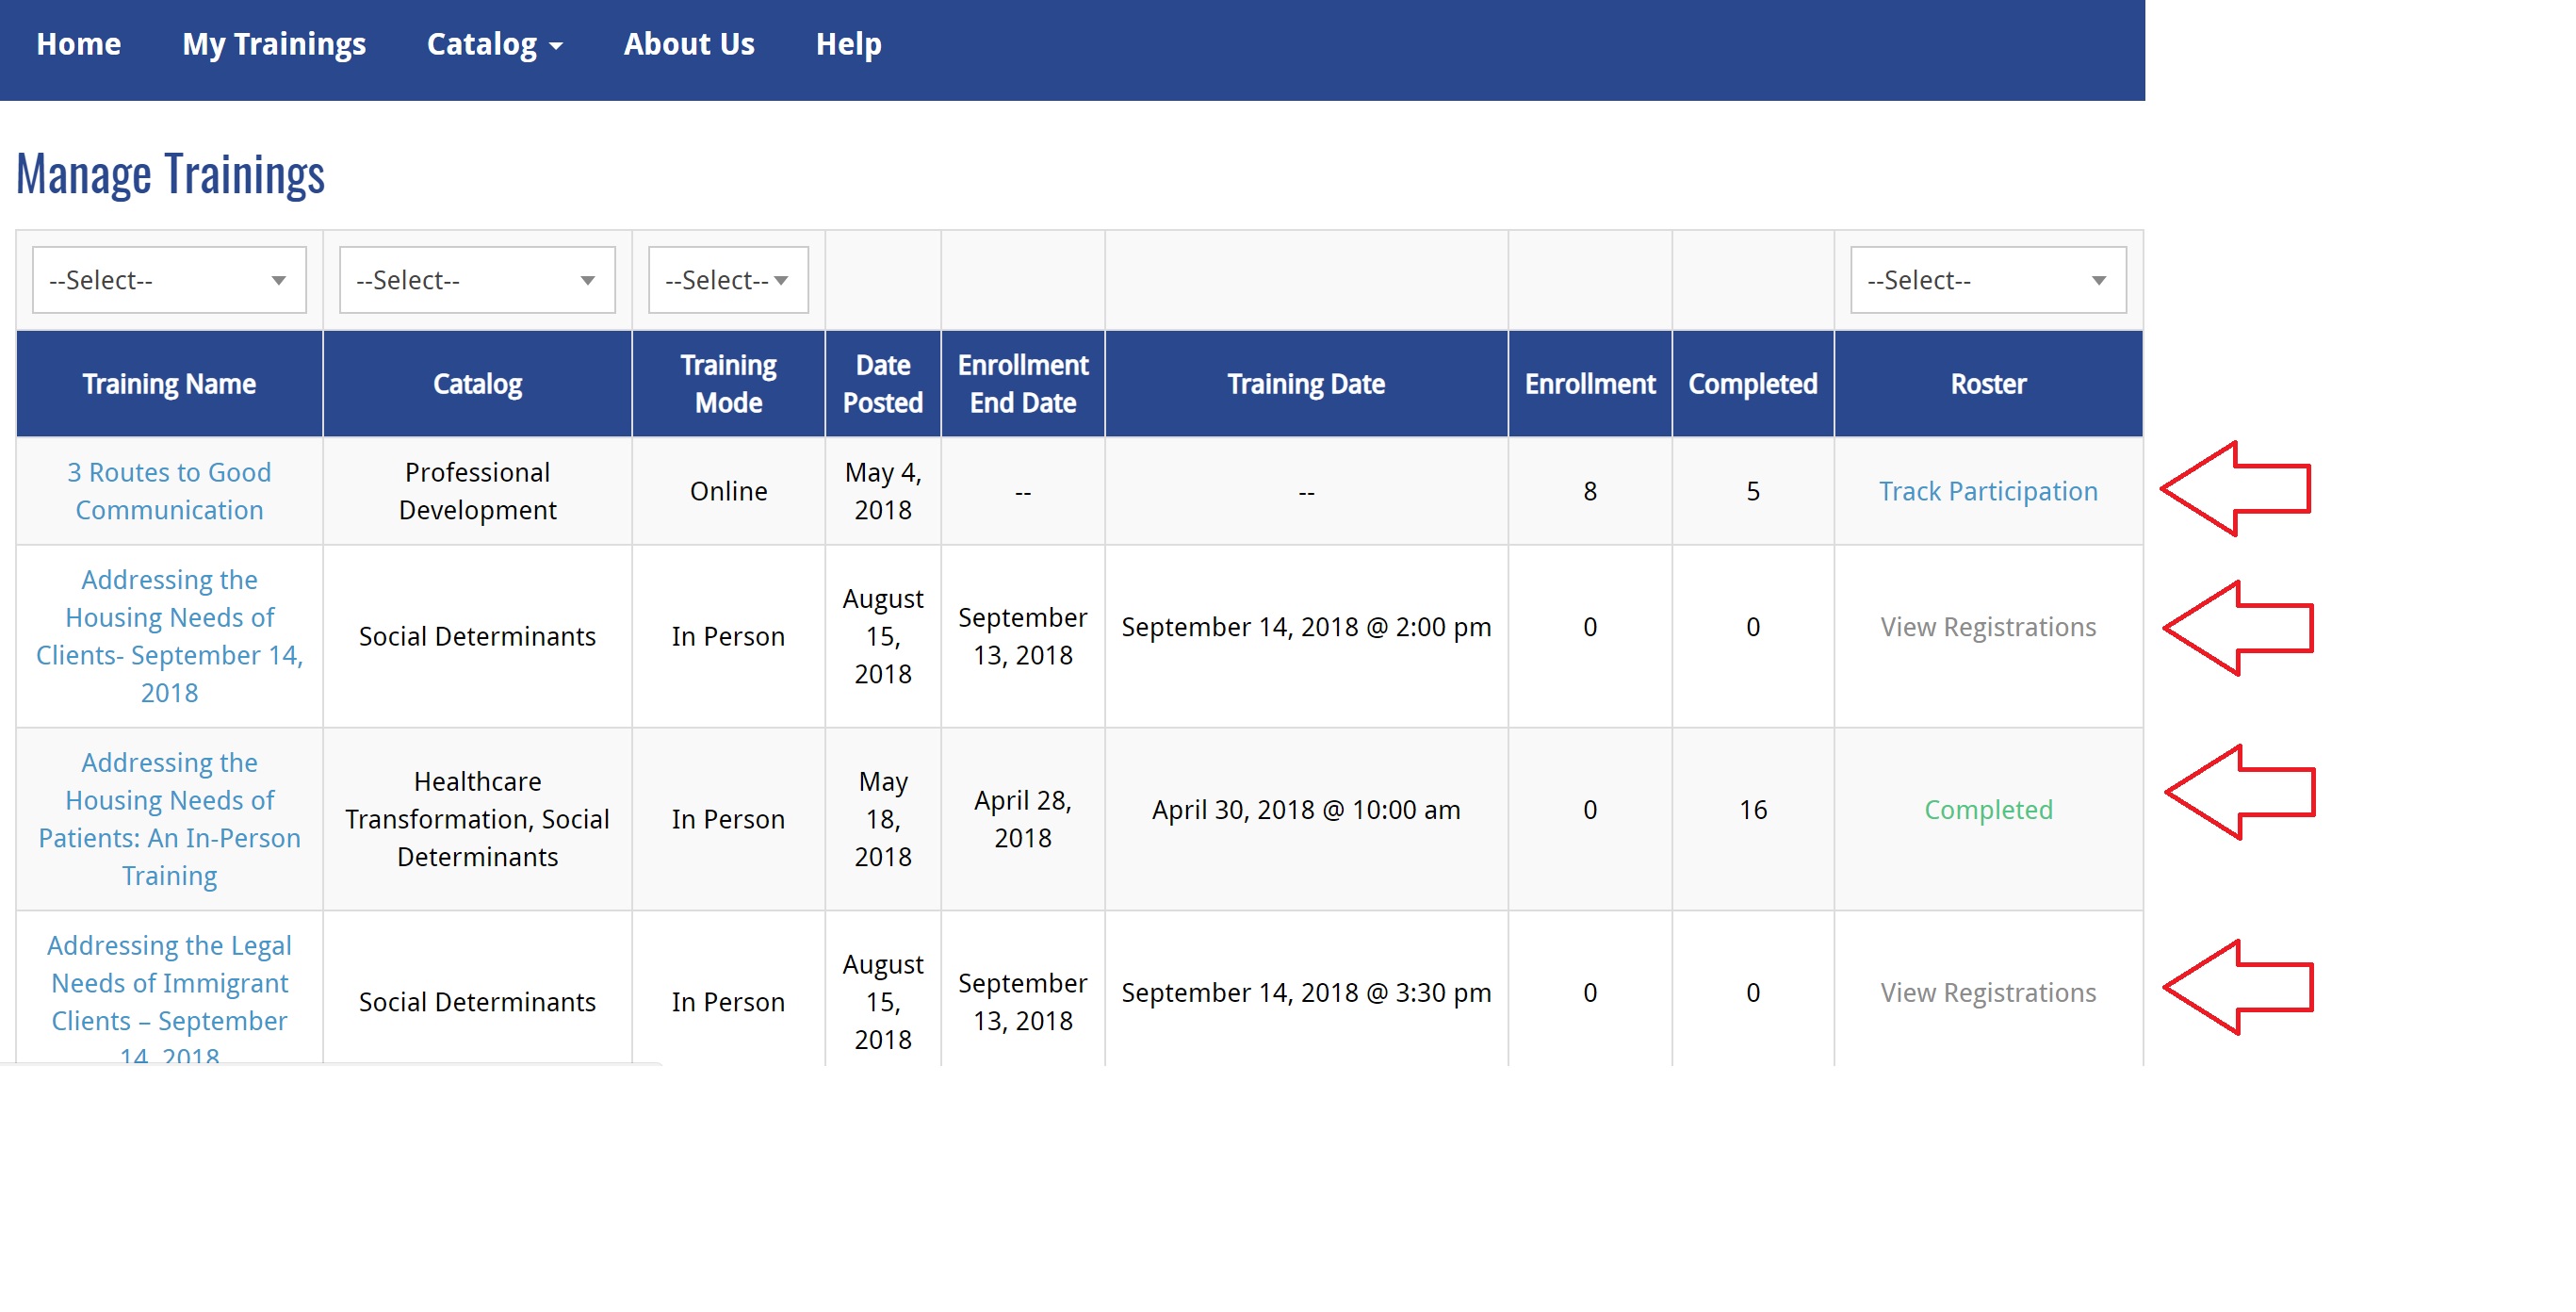
- Roster – a comment on the status of the roster for this training. Clicking on any of the following options in this column will open up the training’s attendance list (roster)
- Track Participation – the default for online courses where an administrator can track users registering and completing the training
- View Registrations – for in-person and webinar trainings that have not yet occurred where an administrator can track the registration ahead of time
- Confirm Attendance– for in-person and webinar trainings that have just occurred that require an administrator to verify the attendance; the attendees will not be considered ‘Complete’ for participation in this training until the attendance has been verified
- Completed – for in-person trainings that have occurred with a verified attendance list
3. Accessing the Registration tables (Rosters)
To access the Registration Table (Roster) for a particular training, click on the status listed in the Roster column (far-right).
4. Navigating the Registration Table
You will now presented with a page outlining key pieces of enrollment information for the training.

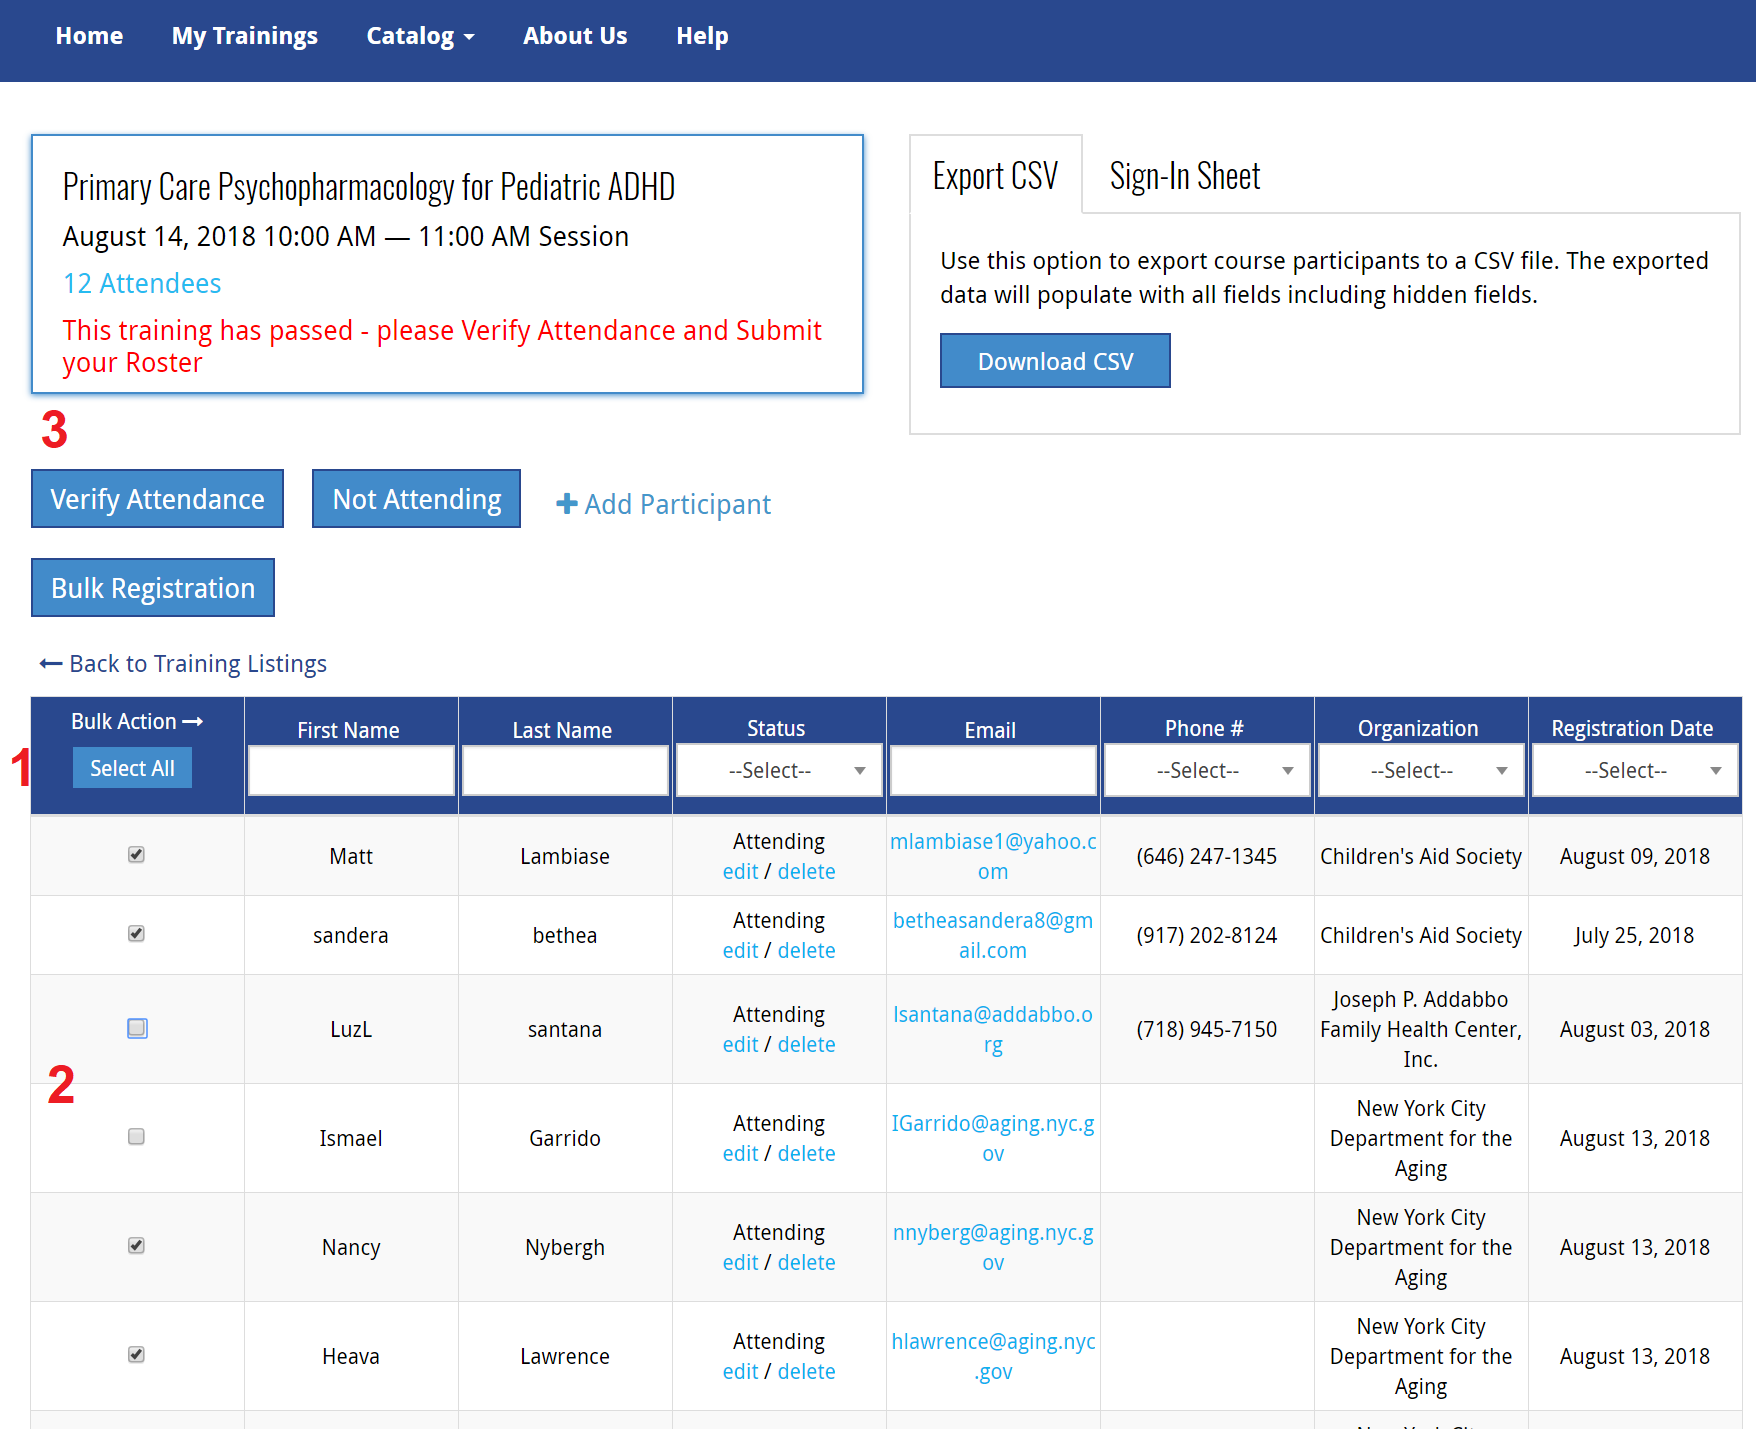
Key Areas of the Registration table:
- Training Details section
- Name of training
- Date (if webinar/in-person)
- Number of attendees / # completed (if applicable)
- Status of training (if the training already occurred, a red message will indicate that an administrator needs to verify the attendance list)
- Export Options
- Export CSV will download a csv (excel) spreadsheet with all the registrations into your browser
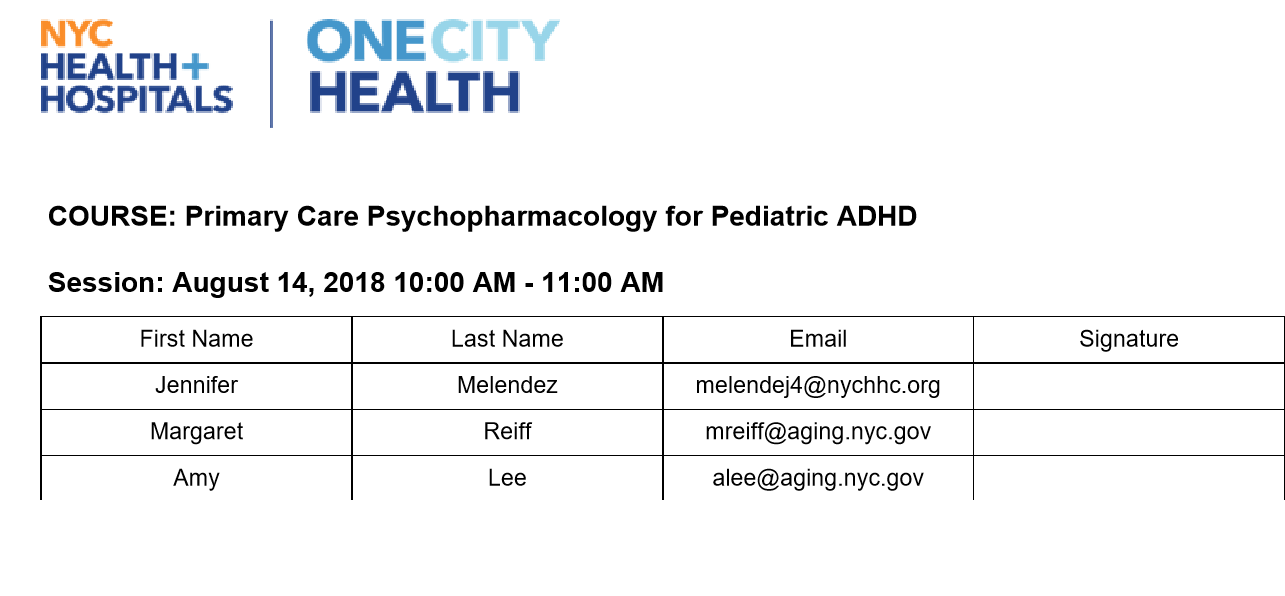
- Sign-In Sheet – will download a printable PDF Sign-In Sheet with a table containing branding, training details, first names, last names, emails, and an empty signature column to bring onsite to a training event. This is the easiest way to have employees sign-in and confirm that they are actually attending. This is a crucial step to verifying attendance (see second section below on attendance verification)
 3. Bulk Actions
- Verify Attendance
- The table’s first column contains check-boxes for each entry – if any, or all, are selected and Verify Attendance is pressed, those employees’ entries will change from Attending to Complete and they will be sent to the Master Training Database of course completions. These employees will also be able to then log into the OCH LMS and receive their certificate and have their transcript updated with their completion. This is the crucial Attendance Verification step outlined in greater detail below).
- Not Attending
- For employees who registered but do not attend the training session, selecting their entry and clicking Not Attending will update their status from Attending to Not Attending; in other words, you can mark employees as Not Attending to signify that they are backing out of a training or did not show up. They will not receive any credit and will not be complete for the training.
- Bulk Registration
- A tool used primarily by HWapps Account Services, it is advised to use this tool under supervision. This tool allows you to bulk enroll employees into the training. Seek assistance if you need to bulk enroll employees.
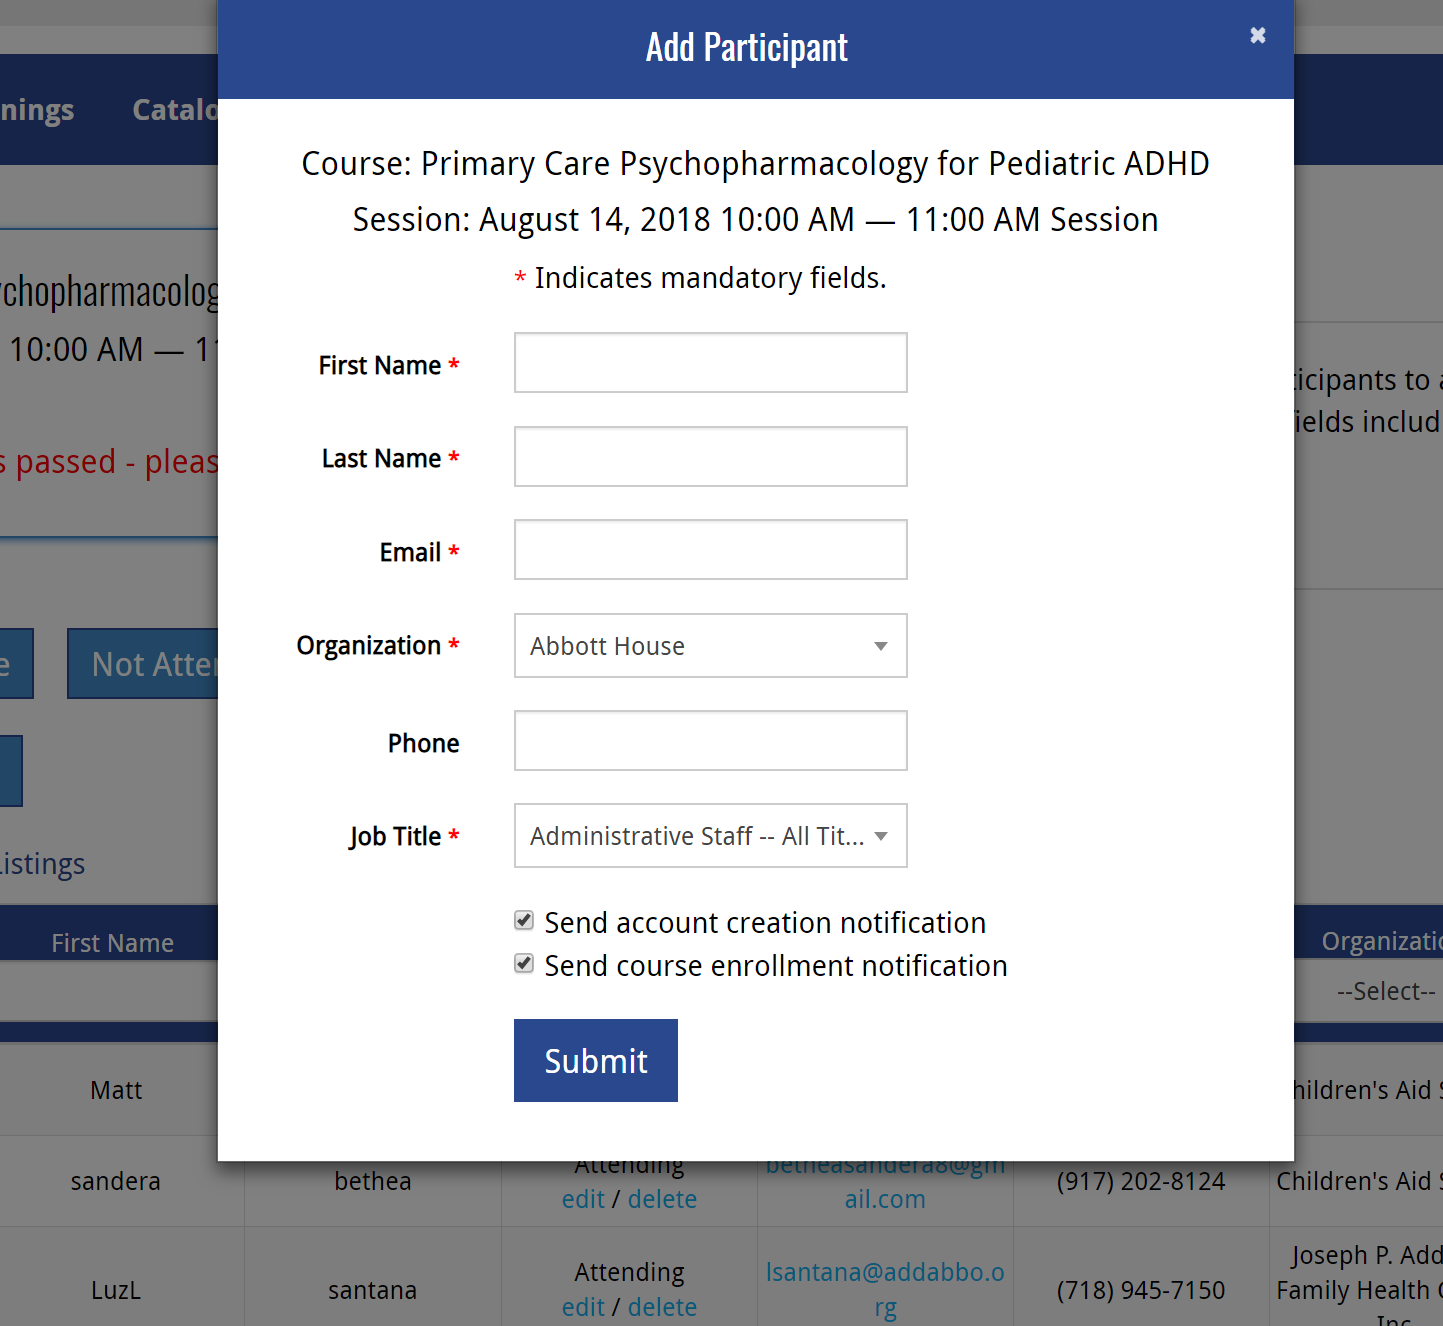
- Add Participant
- To easily add employees to a training, you can manually add their entry to the session by clicking on this tool and filling out a brief form. If you are on-site at a training event and an employee shows up who is not on the sign-in sheet, you would use this tool to add them to the registration table to ensure that they get credit for attending.
- When you use the Add Participant to the training tool, the following occurs:
- An entry with the employees’ information that you entered will appear in the table and set as Attending
- If you select “Send account creation notification” when you added the participant, the OCH LMS will look at their email address and check to see if this employee has an OCH LMS account. If there is an existing account and this field is selected, no account creation email is sent. If there is no account, the OCH LMS automatically creates one and sends an email confirmation when this field is selected.
- If you select “Send course enrollment notification”, an email confirmation will be sent to the employees’ email indicating they were enrolled in the training.
- Tool tip: If you are using the Add Participant tool after the training has occurred, you may not wish to send email communication to employees so to not confuse them.
4. Registration Table
- Bulk Actions column – allows you to select multiple, or all, entries to apply a bulk action (bulk verify attendance, bulk mark as not attending, etc.)
- First name (searchable)
- Last name (searchable)
- Status* – Attending, Confirmed, or Not Attending (filterable by drop-down menu)
- These fields are editable where an administrator can edit and save any of the information tied to the employee’s entry in the table for their registration. Deleting an entry should only be used in an instance where an employee has wrongfully or accidentally registered for a training and they need to be removed from the attendance list.
- When you ‘edit’ an employees’ status, a pop-up of all their information appears – you can add/edit any information for their entry, whenever needed, just be sure you Update or Save at the bottom of the form.*
- Email (searchable)
- Phone # (filterable by drop-down menu)
- Organization (filterable by drop-down)
- Registration Date (filterable by drop-down)
* HWapps is in the process of integrating the back-end Course Participants Database (CPD) and Master Training Database (MTD) with the front-end Rosters. Before these systems can fully “talk” to each-other, if you make any changes – changes to employee information or deletion of registrations – be sure you reflect the changes in the other databases. For example: If I want to unenroll Jane Doe for Training A on the front-end Rosters, I can delete her entry on the Registration table. I would then want to search for her in the CPD and remove her entry there as well. Once the integration has occurred, this will no longer be necessary and making a change in one place will make the change everywhere.
II. Verifying Attendance
Once an in-person training has occurred, you must verify the attendance on the OCH LMS so that the data reports reflect employee participation. Without doing so, the OCH LMS will have no record that attendees in in-person trainings actually attended an in-person training.
1. Verifying Attendance process
Step 1: With your sign-in sheet of attendees in an in-person training handy, navigate to the Manage Trainings table (Section I item 1 above).
Step 2: For a training that has just occurred and in need of having its attendance list verified, the Roster status will be listed as Confirm Attendance. Click on Confirm Attendance.
Tool tip: Filter the Roster column by Confirm Attendance to easily find which rosters need to be verified.
Step 3: Compare the expected attendance to the actual attendance: identify which attendees were not present at the in-person training.
Step 4: On the registration table (roster) for the training you are verifying, select Select All under Bulk Actions. This will “select” every employee on the attendance list.
Step 5: De-select the entries for the employees on the attendance list who did NOT attend the training. You are signifying that these participants did not attend.
Step 6: Complete the verification by selecting Verify Attendance. After you have verified your attendance, you are done. The ‘Status’ of the employees who were selected as having attended will change to Complete while the ‘Status’ of employees who were not verified (left de-selected) will change to Not Attending.
The image below demonstrates the process of verifying an attendance list where one employee (Sasha Erickson) was absent. After ‘Verify Attendance’ is pressed, the other five employees’ status will change to “Confirmed” and their records sent to the training reports, while Sasha’s will change to “Absent” and she will not be marked as complete in the training reports.
In the above image, the following steps are being taken:
- Clicking Select All
- De-selecting two entries who did not attend
- Clicking Verify Attendance
Step 7: Once an attendance list has been verified, the page will refresh and update. In the details section at the top, it will list:
- How many employees attended
- When the training was verified
- Which admin verified the attendance list
In the back-end, the employees who attended and were confirmed through roster verification will have their entries sent to the Master Training Database (backend -> Training Reports -> Completions).

Having issues? Contact HWapps at support@hwapps.org